Estimating workflow
Electrical Takeoff: Measure and Record Quantities
Create a checkable electrical takeoff with drawing references, calibrated measurements and clear units. Follow a route example with rises and drops.
7 min read
Show where each quantity came from, how you measured it and what it includes.
A takeoff is a record of the quantities needed for the work being estimated. A total such as “25 m of raceway” gives a quantity, but it does not explain the route, drawing revision or measurement method behind it.
A useful takeoff lets another estimator follow the marked drawing, repeat the calculation and understand the result. That record is the audit trail. It also makes it easier to find what needs to change when a drawing is revised.
Once the scope is clear, use the following steps to measure and record the work.
1. Identify the work and its source
Give each measured item a clear description and a reference you can find again. Record:
- The system and location, such as distribution work in the ground-floor electrical room.
- The item being measured, including the size or type where it affects pricing.
- The drawing number, revision and relevant detail or schedule.
- A takeoff reference, such as route R01, that also appears on the marked drawing.
- The unit, calculation and any assumptions or unanswered questions.
Keep different sizes, types and installation conditions separate when they need different prices or labour allowances. Do not combine all raceway lengths into one total if some are underground and others are exposed inside the building.
Mark completed measurements on the drawing. Use a consistent colour or label so you can see which items have been counted and avoid measuring them again on another sheet.
2. Check the scale before measuring
Use stated dimensions where they describe the length you need. If you measure from a PDF, check its scale against a known dimension before relying on the result. Do the same for a detail shown at a different scale, and recheck when you use a revised or resized drawing.
Bluebeam's measurement documentation explains calibration against a known length and allows different scales for separate areas of a page. The practical lesson applies to your measurement process: check the scale for the particular drawing area you are using. [1]
As an additional check, measure another known dimension after setting the scale. If it does not agree, investigate before continuing. A clear, dimensioned drawing is a better basis than guessing from a blurred scan. If a drawing says not to scale it, follow that instruction and obtain the dimensions you need.
3. Match the unit to the work
Choose the unit before entering the quantity, and keep it visible beside the result.
- Individual devices or fixtures — Typical unit: Count — What to check: Identify the type and check repeated layouts.
- Raceway or cable route — Typical unit: Metres (m) — What to check: Record the route and any rises or drops. State exactly what the length represents.
- A rectangular surface — Typical unit: Square metres (m²) — What to check: Record length, width and the treatment of openings.
- A rectangular solid — Typical unit: Cubic metres (m³) — What to check: Record length, width, depth and the number of identical items.
These are examples of quantity units, not rules for every contract. Match the quantity unit to the item being priced. Convert units explicitly when a quotation or labour unit uses a different basis. A price per 100 m cannot be multiplied directly by a quantity in metres without accounting for the factor of 100.
4. Show the calculation
Keep the dimensions and calculation with the quantity. For a route, record the separate lengths rather than typing only their sum. For repeated work, show both the quantity in one location and the number of identical locations.
Before multiplying a typical room by ten, check that all ten rooms have the same layout and scope. List exceptions separately. A repeated symbol or a similar room name does not prove that the work is identical.
Example: a raceway route with a rise and a drop
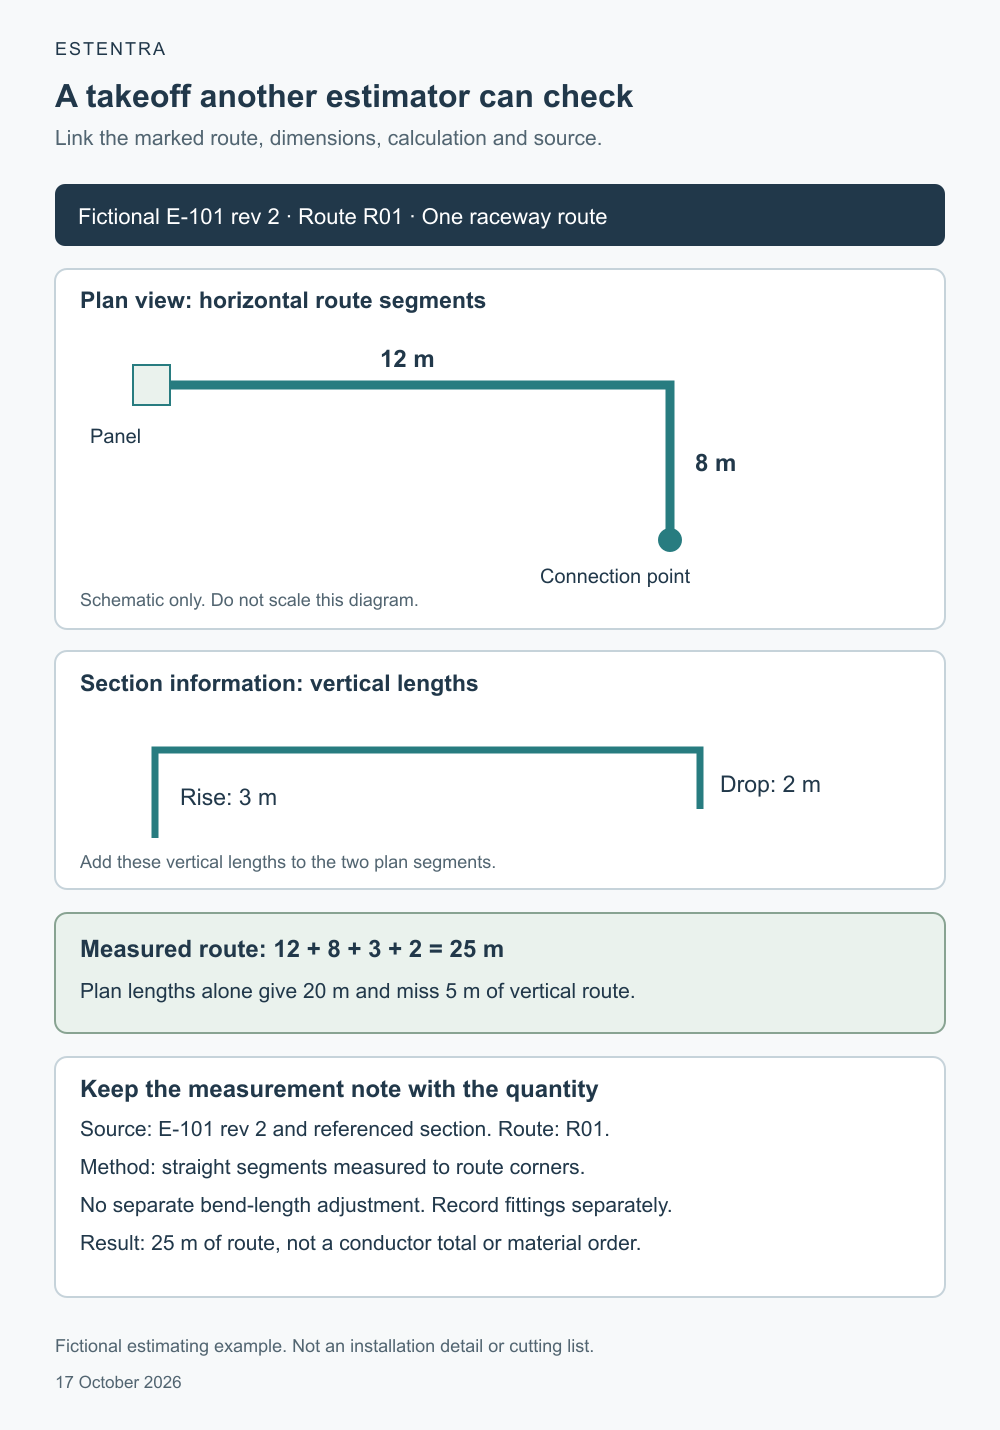
Consider a fictional drawing, E-101 revision 2, with route R01 between a panel and a connection point. The plan identifies two route segments of 12 m and 8 m. The referenced section identifies a 3 m rise and a 2 m drop.
For this teaching example, measure the straight segments to the route corners, with no separate adjustment for bend lengths. Record fittings separately. This is a stated estimating convention for the example, not an installation detail or cutting list.
- First plan segment — Recorded length: 12 m
- Second plan segment — Recorded length: 8 m
- Rise shown in section — Recorded length: 3 m
- Drop shown in section — Recorded length: 2 m
- Total measured route — Recorded length: 25 m
The calculation is 12 + 8 + 3 + 2 = 25 m for one raceway route. Measuring only the two plan segments would give 20 m and miss the 5 m shown in the section.
A useful takeoff note would read:
R01 — one raceway route, ground floor, E-101 rev 2 and referenced section. Plan segments 12 m + 8 m; rise 3 m; drop 2 m. Total 25 m. Straight segments measured to route corners; no separate bend-length adjustment. Fittings recorded separately.
The diagram shows how the marked route, calculation and note relate to one another. The 25 m is a measured route quantity. It is not automatically the total conductor length or the quantity to order. Conductor counts, termination lengths, stock sizes and purchasing allowances require separate decisions.
5. Explain deductions and additions
Keep deductions visible. For example, a fictional wall-finish calculation might start with one face measuring 10 m × 3 m, giving 30 m². If the adopted measurement rule requires deducting the full 2 m² opening, the recorded net area is 30 − 2 = 28 m². Name that rule in the takeoff; the arithmetic alone does not establish that the deduction is appropriate.
If the tender specifies a measurement standard, record its name and edition and apply the relevant rules. RICS publishes NRM 2 for detailed measurement of building works, but do not assume it is the required method for an Ontario project. Check the tender documents. [2]
Keep material waste, spare quantities and order rounding separate from the measured work. For R01, retain the 25 m route record even if a later purchasing decision produces a different order quantity. This preserves the original measurement when you review the order or price a revision.
6. Check the result and preserve revisions
Check the drawing reference, unit, arithmetic and marked limits of the work. For a route, confirm that plan lengths and vertical changes have both been considered. For counts, reconcile the marked items with schedules and investigate differences rather than forcing the totals to match.
Have another estimator check important or uncertain quantities where practical. Give that reviewer the drawing and measurement method so they can repeat the measurement, rather than only checking the addition in your total.
When a drawing changes, keep the earlier marked drawing and takeoff as a dated revision. Record the replacement quantity and the reason for the change. For example, if R01's second plan segment changes from 8 m to 10 m and everything else remains the same, the new route total is 27 m, an increase of 2 m. Check any affected fittings and other items separately.
Retain calculation precision during the working steps and state how you round the reported quantity. Avoid reporting more detail than the source drawing supports.
Before using the quantity in the estimate
Check that another estimator could answer three questions from your record: What was measured? Where did the information come from? How was the result calculated?
If an answer is missing, complete the note before relying on the quantity. A checkable takeoff combines a measured number with enough evidence to explain it.
References
- Bluebeam Technical Support: Setting Page Scales, introductory guidance on known-length calibration, separate axis scales and differently scaled areas. Used for the measurement principle, not as a software walkthrough.
- RICS: New Rules of Measurement, identifying NRM 2 as detailed measurement for building works. No NRM deduction rule is applied or reproduced here.
References checked 17 October 2026. All dimensions, drawing references and calculations in the examples are fictional teaching inputs. The diagram is schematic and must not be scaled.
General estimating workflow guidance. Project requirements and contractual documents take precedence; this is not electrical design or code-compliance advice.